Earthquake Detector
I consider myself lucky to live in a seismically active area (California). Our home is located in a narrow triangle of land, bordered on the north side by the Hayward and Calaveras faults and on the south by the famous San Andreas fault. Those faults have been a source of several memorable experiences over the years and a constant reminder of the awesome power of nature. They also provide opportunities to have a bit of DIY fun.
With this project I intended to do build the simplest device I could that:
- will alert me in real time, as earthquakes happen;
- let me see the core of the Earth (yes, really!).
There are plenty of plans for DIY seismometers on the Internet. Let me make one thing clear from the start - this is not a proper seismometer. It’s a seismic detector, because it is not intended to provide a calibrated record of the ground movements, as seismometers do. All I want is something that tells me “the ground is shaking” and can provide some clues about how big/small near/far the earthquake is. Also, as I mentioned, I want the device to be simple, easy to build, set-up, and maintain, and to take only a small amount of space.
Near-Realtime Data
Near-realtime data (the last 30 minutes, updated every 5 minutes) from the sensor is shown below.
The sensor is located in South San Jose, CA.
To see older data, click here.
Design
When all you want is to detect ground shaking, then you probably can’t go simpler than hanging a rock on a string. Obviously you don’t want to spend your days watching the rock, so you need a sensor that keeps an eye on the rock. Finally, you need some way for whatever is watching the rock to let you know when it starts swinging.
Following this line of thinking leads directly to this magnificent pinnacle of engineering:
The steel bob is hanging on a wire close to a copper plate. The pendulum and the plate act as a variable capacitor - any movement of the pendulum relative to the plate changes the capacitance. The capacitor is hooked into a simple 555 timer oscillator circuit with frequency depending on the capacitance. The result is a square-wave signal with frequency dependent on the position of the pendulum.
A PIC microcontroller measures the frequency and feeds this to a Raspberry Pi, which processes the data and sends it to the real-time display above.
What about seeing the Earth Core?
Yes, “seeing” the core of the Earth is totally doable with this equipment. And a tiny bit of help from USGS. Here is how it works…
As the seismic waves travel from the earthquake location toward the sensor they traverse the interior of the Earth. The outer core of the Earth blocks some of these waves. Effectively you get a zone behind the core, called seismic shadow, (see here), where some of the waves cannot reach. (Due to reflection and refraction it’s a bit more complicated than that, but the overall picture stands.)
So, if the detector is sensitive enough to be able to detect large earthquakes all over the world, we can use this to “see” the outline of the core. We keep track of earthquakes all over the world and note whether each earthquake is detected or not at the fixed sensor location. After a certain distance from the sensor to the epicenter, there comes a point where earthquakes are not visible to the sensor, even if they are big enough that they should have been visible. If we keep track of locations the sensor cannot see, this gives us a "picture" of the core:
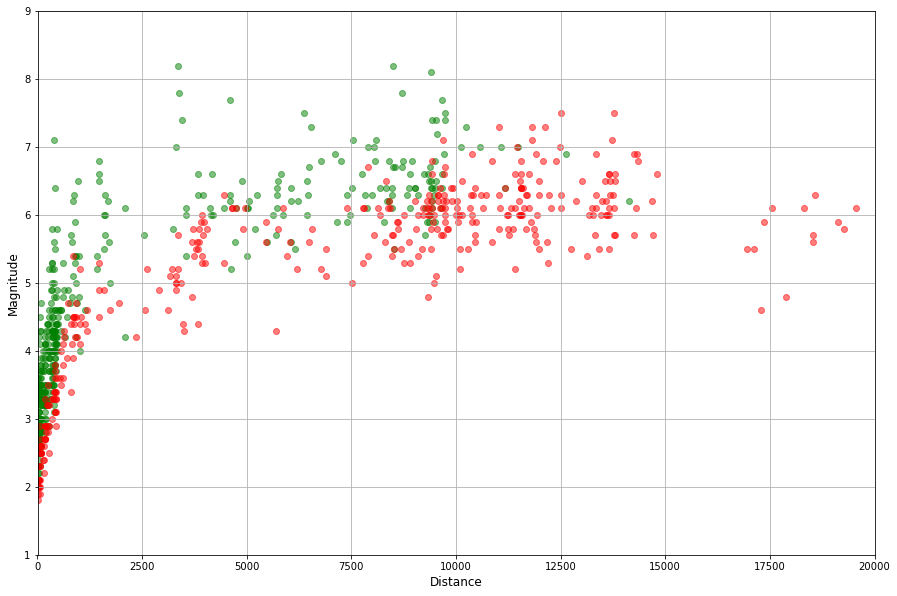
The plot shows the magnitude (on the Y-axis) and the distance in kilometers to the epicenter (on the X-axis). The green points are earthquakes that have been detected. Reds are the ones that the sensor did not detect (to be more accurate, we are talking about detecting the p-wave here).
Note that the green dots start to disappear at distances around 10'000 km. This is the seismic shadow!
Notable Earthquakes
Following are some screenshots of interesting events detected by the sensor:


, 2019-12-22")
Construction
Here are some pictures of the actual device. It sits in the cabinet in the corner of the room, behind glass where the air currents do not affect it.


Schematic and Source Code
- Capacitive sensor schematics: schematics.pdf
- PCB Gerber file: Gerber_CapacitiveSensor.zip
- Assembly code for the PIC microcontroller: cap_sensor.asm
- Python code for the Raspberry Pi: python_rpi_scripts.tgz