Look at these two microscopic images. Both are of the same specimen (a dust mite), both are taken with the same microscope and same camera. Yet, they look very different. The difference is in the way the subject is illuminated.
Most entry-level microscopes come with a single way to illuminate your specimen – bright field illumination. For many types of specimen this works just fine. But often you could get much better results and see much more details if you change the illumination. Click on both of these images to get the full-resolution version and you will see that the darkfield image not only looks better, but shows much more details that are almost invisible in the brightfield. Notice how much more you can see of the internal structure of the mite, and how better is the contrast of the feet.
If you want to try darkfield microscopy, you have two options: you could either buy a darkfield illuminator attachment (which will cost you anywhere between $50 and $1500), or you can try making one yourself (this one will cost you something in the range of one penny to a quarter).
How does darkfield illumination work
Before starting any work, just a few words on how the two illumination methods work.
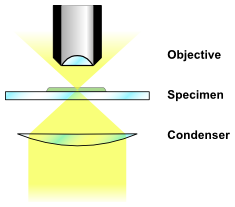 Brightfield illumination |
First, take a look at the brightfield illumination method. Most likely this is how your microscope works right now. The specimen is illuminated from below – what you see depends on the level of transparency of the different parts of the specimen. If the specimen is nearly fully transparent, the contrast of the image will be low. In order to increase the contrast and visibility of various tissues, you may want to stain the sample. |
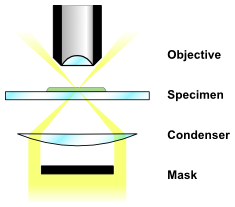 Darkfield illumination |
To get “darkfield illumination” you can position a circular mask on the light path, converting the solid beam into a ring (or tube) of light which is dark in the center. This tube is “pinched” by the condenser lens in such a way that the light converge on the sample, but misses the microscope objective.
Let say we don’t put any speciment on the slide and are looking an empty glass slide. Because the light misses the objective entirely, all we will see would be darkness. If we put something on the slide, however, the specimen would be lit from the ring of light. Some parts of the specimen scatter the light and will look bright. Scattering and bending of the light will occur in many places, depending on the varying refractive index in the sample – all those places, that looked almost entirely empty in direct illumination will now be clearly outlined. |
Making and positioning the filter mask
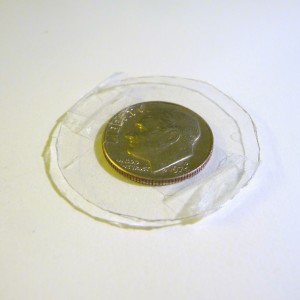
Dark field mask
The best size and position of the darkfield mask will vary from one microscope to another. The easiest way to figure out the correct size and placement is to experiment.
Bring the condenser up to its highest position, closest to the slide. Fully open the condenser diaphragm. Find some specimen you can experiment with and put it under the microscope. Switch to the lowest magnification and focus.
Get a coin and put it on a microscope slide. Put the slide on the light path, just below the the condenser lens and look through the eyepiece. You should see some kind of shades moving along each edge and line of the image. Do this for a while until you get a feeling when the coin is centered and when it is off-center and can tell it just from looking through the eyepiece. This is a bit hard to explain, but if you try you will find it quite easy.
Keeping the coin approximately centered, try moving the condenser up and down. Try to make the background dark while keeping the specimen is outlined in light. Experiment with different coin sizes, until you get good results.
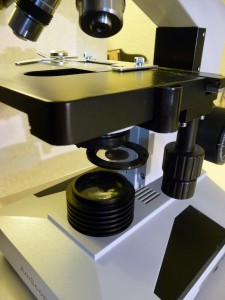
The mask in the filter holder
If your microscope has color filter holder, you can probably use this to hold your coin. Cut a piece of transparent plastic to match the filter size, attach the coin to it using transparent scotch tape, and put it in the filter holder. Any plastic will do, as long as it is transparent. For my filter I just cut a circle from some cookie box.
If you don’t have filter holder, you have to figure out a way to keep the coin in place yourself. In the worst case, you can always get creative with scotch tape.
